
Table of Contents
Steps to Configure EasyMail account as IMAP in Outlook for Windows #
- Launch the Microsoft Outlook application in your Windows system.
- Click File and select Add Account.
- Locate and select ‘Manual setup or additional server types’, and click Next
- In the ‘Choose Service’ page, select ‘POP or IMAP’, and click Next.
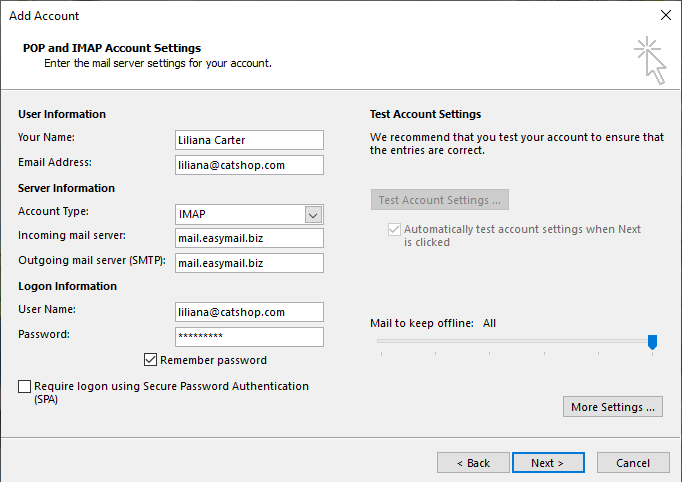
- In the ‘Add Account‘ page, provide the following details:
- User Information
- Your name: Your preferred display name. This will be used in the emails you send from Outlook.
- Email address: Your Easymail account email address (user@domain.com for organization accounts)
- Server Information:
- Select IMAP from the Account Type menu.
- Incoming server: mail.easymail.biz – for organization accounts (if your domain is hosted with Easymail).
- Outgoing Server: mail.easymail.biz
- Logon Information:
- Username – The email address of your Easymail account (user@yourdomain.com for Email Hosting users).
- Password – Easymail Account Password.
- User Information
- Ensure that ‘Remember Password’ is checked, and click More Settings.
- Outgoing Server tab: Select My outgoing server (SMTP) requires authentication and ensure that Use same settings as my incoming server is checked.

- Select the Advanced tab and configure the Settings as follows:
- Incoming Server (IMAP): 993
- Select SSL from the drop down menu for encrypted connection.
- In Outgoing Server, Select SSL from the drop down for the encrypted connection.
- Outgoing Server (SMTP): 465
- Click OK

- You will be redirected back to the ‘Add New Email Account’ section.
- Click Test Account Settings to check the configuration info.
- When the tests are successful, Outlook will display a popup as shown below. Click Close. If you see any errors, check the troubleshooting section.

Specific Instructions for Outlook IMAP #
Sent Items #
By default, our SMTP Servers automatically place sent emails in the Sent folder. However, when you send an email with Outlook, it also saves another copy in your Sent folder there.
To avoid duplicates in the Sent folder, change the following settings:
In Outlook 2007:
- From the Tools menu, select Options and then Preferences
- Choose Email Options and uncheck Save Copies of messages in Sent Items folder.
In Outlook 2010:
- Select your Easymail account from the Account Settings menu and click Change
- Choose More Settings, click Sent Items and select, Do not save copies of sent items.
Downloading full messages #
By default, Outlook downloads just the Sender, Subject, and the Date Information (headers) when syncing email. It downloads the full message only when you click on that email. You can change this behavior by changing the Send/ Receive Settings.


